
Learn How to Use LMS for Teaching
A step-by-step reference for setting up your profile, building a course, adding activities, managing learners, and tracking completion.
Tap any section below to expand it. Tap again to collapse.
a Customizing Your Teacher Profile
Your teacher profile is visible to your learners and colleagues, so it's a good opportunity to introduce yourself, prove that you're a human being and not a chatbot, and earn some trust from your students.
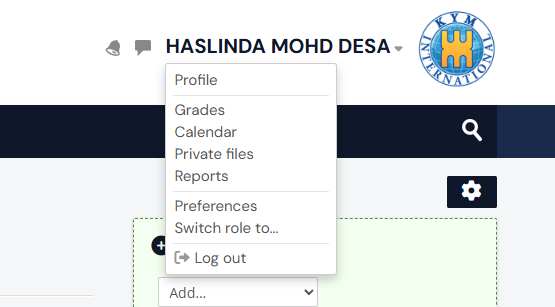
Click Profile in the upper right corner (under your name) to reach your personal page, where you can edit personal information, add a photo, and write an introduction.
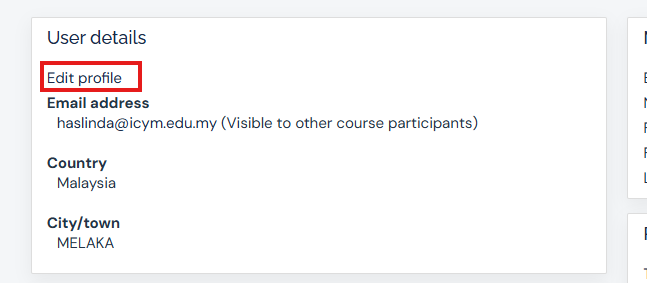
Click Edit profile to do this.
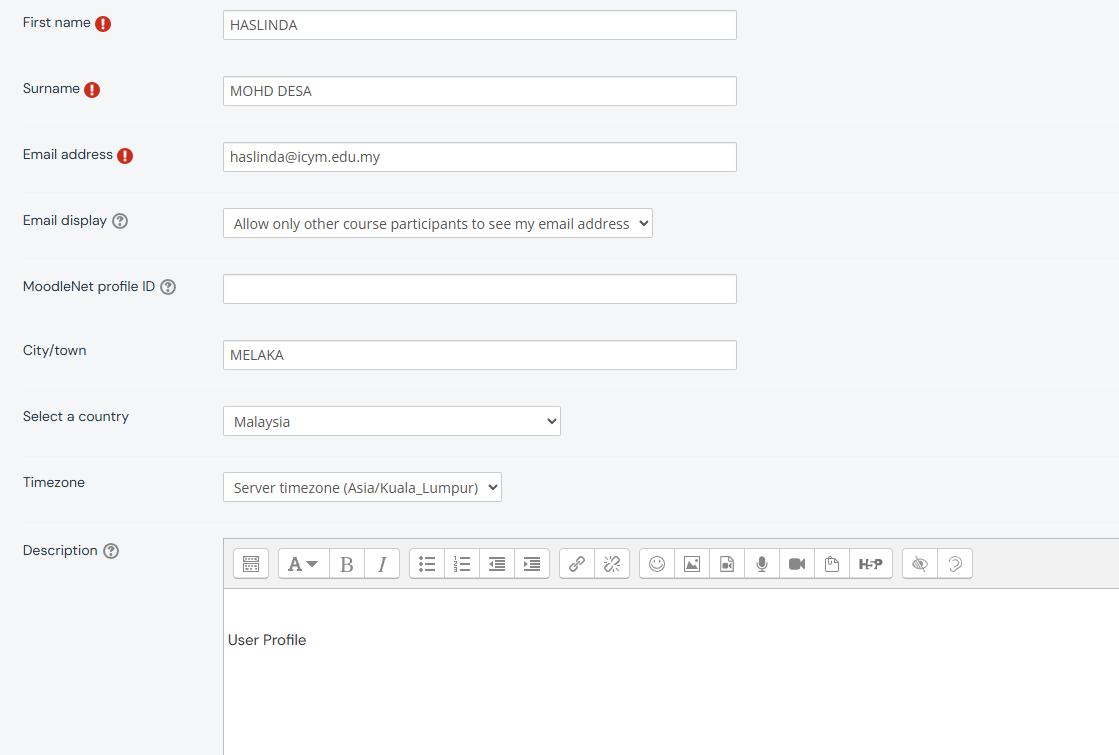
On the edit screen, you can enter some text about yourself (or record a video introduction if you like), add a photo, and leave additional contact information.
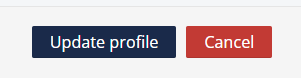
Click Update Profile to save the changes.
b Creating an eLearning Course
You can create a new course using the Lecturer Resources menu, then selecting Create Course.
You can create a new course within your existing course categories. Categories are organized by School — however, for ODL (Open Distance Learning) programs, all programs reside under the ODL category, and all ODL courses are created by the admin.
To change the course format, click the gear icon and choose Edit settings from the drop-down menu. Scroll down to the Course format section, choose the format you'd like, then click Save and display at the bottom of the page.
There are several course formats to choose from:
| Course Format | Description |
|---|---|
| Weekly format | The course is organized week by week, with each section having a date heading. Moodle creates a section for each week automatically, and you can add content, forums, and quizzes within each week's section. The current week is highlighted. |
| Topics format | The course is organized into topic sections that you can title yourself. Each section can contain activities, resources, and labels. This is the default format on new Moodle installations. Via Course administration > Edit settings, you can also choose to "show one section per page." |
| Collapsed Topics | Essentially the same as the Topic and Weekly formats, but with a toggle for each section (except section 0). Toggles reduce the amount of information shown at once, helping avoid the "scroll of death" in content-heavy courses. Each learner's toggle state is remembered per course. |
| Onetopic format | Displays each topic as a tab, keeping the current tab active as you move between resources — so returning from a module like a blog or glossary brings you back to the tab you started from. Based on the standard "Topics" format. |
| Tiles format | Displays course topics as clickable tiles rather than a list. Clicking a tile reveals its content with an animated transition, and the layout adapts to different screen sizes. Activities within a tile can also display as "sub-tiles," and tile icons can be chosen from a predefined set. |
| Edwiser | Functions the same as the Topic format. |
c Adding Activities and Resources
Activities are the ways students interact with a course. Quizzes, glossaries, forums, and assignments are all generally called "activities."
Resources are items used to support learning — documents, presentations, or even an external web page such as a YouTube video.
- Click Turn editing on (found via the gear icon in the upper right).
- Click the + Add an activity or resource link that appears after each course section.
- Choose the activity or resource you'd like to use from the pop-up window — there are 14 types of activities and 7 types of resources available — then click Add.
- Choose a section, click + Add an activity or resource, and select Quiz. Fill in the quiz name (that's the only required field), then click Save and return to course to create the quiz shell. You can also explore optional settings such as time frames for the assessment or a limit on the number of attempts allowed.
- Click Edit quiz, then click Add → a new question to start filling the quiz. Moodle offers 15 question types, including multiple choice, matching, and drag-and-drop. Choose a type and click Add, then fill in the question name, question text, answers, and feedback.
- Click Save changes when ready. You'll return to the quiz editing screen, where you can repeat the process to add as many questions as you need.
Choose the section where you'd like to add the activity, click + Add an activity or resource, and choose Assignment. Give the assignment a name and describe what you expect students to do — for example, watch a video and share their opinion, or edit and submit an improved version of a text.
Two useful settings worth exploring:
- Availability — set time frames for submission (allow submissions from, due date, cut-off date), and optionally set yourself a reminder to grade by a certain date.
- Submission types — choose Online text if students should type responses directly in LMS, File submissions if they should attach a file, or both. You can also restrict accepted file formats and set a word limit for online text.
Click Save and return to course when finished.
d Managing Learners
Once your course is ready, it's time to invite learners. First, set up your enrolment methods: within a course, choose the Participants tab, click the gear icon in the upper right, and select Enrolment methods.
There are three enrolment methods available:
- Manual enrolment
- Guest access
- Self enrolment
By default, only manual enrolment is enabled. To activate self enrolment or guest access, click the eye icon next to it. Clicking the gear icon next to the eye lets you configure additional settings such as enrolment duration, an enrolment password, or a maximum number of users.
e How to Enroll Students on a Course
Usually, teachers don't need to add users to the system, since the user list is pre-loaded by an admin or manager. To enroll existing students on your course:
- Choose the Participants tab in the left menu.
- Click Enrol users in the upper right area.
- In the pop-up window, select users or groups of users from the drop-down list — type a student's name and click it to add them to the course.
- Click Enrol selected users and cohorts when finished.
f How to Set Up a Gradebook
A gradebook is a Moodle feature that collects scores for graded activities in your course. It lets you view marks and manually enter grades for offline activities.
To set up a gradebook, click the gear icon in the upper right and select Gradebook setup. You'll see the full list of graded items for the course, each with a Weights column — the bigger the number, the more important that grade is toward the overall course total.
To organize items, scroll down and click Add category. For example, a course might have three categories: Assignment, Quiz, and Simulation. After naming each category, click Save changes, then move items into their category by clicking the arrow icon to the left of each item's name.
Once items are organized, assign weights to each category by ticking its checkbox and entering a value — for instance, giving Assignment a weight of 50, with the remaining weight automatically distributed (or manually set) across Quiz and Simulation so the total equals 100. You can also manually set weights for individual items within a category. Click Save changes when done.
g How to Grade Learners' Assignments
To grade an assignment, choose Grades in the left menu and click the activity you'd like to grade. This opens the Grading summary page with two options: View all submissions or Grade.
Click View all submissions first to see the list of enrolled users and their submissions (or lack thereof). You can assign statuses so it's always clear which work still needs marking.
Click Grade to begin reviewing individual submissions. The grading interface lets you leave annotations, text comments, color marks, and feedback stamps. Enter the grade in the right panel, update the status, then click Save changes to finish, or Save and show next to move to the next student.
h Course Completion — Overview
Course Completion lets you define what it means for a learner to finish your course, and optionally track completion of individual activities along the way. It's set up in five parts, covered in the sections below: enabling completion tracking, configuring course completion conditions, setting default activity completion, bulk editing activity completion, and enabling activity completion on individual items.
1 Enable Course Completion Tracking
Enable course completion for your course by setting Enable completion tracking to Yes on the Edit course settings page, under the Completion tracking section.
Once enabled, an Edit course completion settings link appears in the course's Course Management page, under Course Settings, giving you access to Course completion, Default activity completion, and Bulk edit activity completion.
2 Course Completion Settings
| Setting | What it does |
|---|---|
| General | Choose whether the course is marked complete when ALL or ANY of the requirements below are met. |
| Condition: Activity completion | Select which activities count toward course completion. Requires Activity completion to be enabled on those activities. You can require ALL selected activities or ANY one of them. |
| Condition: Completion of other courses | Makes completion of another course a prerequisite for this one. This doesn't block the student from accessing the current course — it just means this course won't be marked complete until the linked course is. Select one or more courses in the "Courses available" box (Ctrl+click to deselect one). |
| Condition: Date | If enabled, sets a date after which the course will automatically be marked complete. |
| Condition: Enrolment duration | If enabled, marks the course complete a set number of days after the student's enrolment date. |
| Condition: Unenrolment | If enabled, marks the course complete once the student is unenrolled. |
| Condition: Course grade | If enabled, sets a required passing grade for completion. Note: this looks at the total points (raw grade), not a percentage. |
| Condition: Manual self-completion | If enabled, students can mark the course complete themselves via the Self completion block (which must be added to the course separately). |
| Condition: Manual completion by others | Users with selected roles (e.g. Non-editing teacher, Teacher, Manager) can mark the course complete on a student's behalf. ALL means every selected role must mark it; ANY means one is enough. |
3 Default Activity Completion
Default activity completion lets you select one or more activity or resource types and change their default completion setting (usually "manual") to something else. For example, you could set all quizzes to require a specific passing grade by default, or set assignments to be marked complete automatically once submitted.
4 Bulk Edit Activity Completion
Bulk edit activity completion lets you change the completion requirements of several existing activities at once. For example, if you have four quizzes set to manual completion, you can bulk edit all four so they instead require a grade before being marked complete.
5 Enable Activity Completion
Activity completion lets you define what "completed" means for each activity or resource. Once turned on, learners see a checkbox next to each included activity, which becomes checked once the completion criteria is met — this might be viewing the item, receiving a certain score, or the student manually marking it as complete.
To add completion tracking to an activity:
- Navigate to the course you want to track.
- Click Turn editing on.
- Add a new activity, or open the settings of an existing one.
- Expand the Activity completion section at the bottom of the activity's settings.
- Choose one of three completion tracking options.
| Option | What happens |
|---|---|
| Do not indicate activity completion | No completion checkbox is shown next to the activity. |
| Students can manually mark the activity as completed | Students tick the checkbox themselves to mark it complete — note that they can do this even without actually doing the activity. |
| Show activity as complete when conditions are met | The checkbox only fills in once the selected completion criteria are satisfied. |
When "Show activity as complete when conditions are met" is selected, the available conditions depend on the activity type:
| Condition | Applies to |
|---|---|
| Require View | For resources like Files, Pages, and Links — learners must open/click the item to complete it. |
| Require Grade | If a grade is configured for the activity, learners can be required to receive any grade, or specifically a passing grade, to complete it. |
| Require Submission | Used across Assignment, Quiz, Forum, and Feedback activities — effectively requires some form of interaction, such as submitting a document, posting a forum reply, or providing feedback. |
A teacher can also mark an activity complete on behalf of a student from the Activity completion report, provided they have the Override activity completion capability (enabled by default).
Adapted for quick reference · Lecturer Resources